AHU Economizer Configuration User Guide:
Importing Master Driver Configuration Store
At the initial homepage, the user will be prompted to upload the Master Driver file. Values within the Master Driver Configuration Store will be parsed to provide options for Campus, Buidling, Device and Points throughout the application.

Once the user has selected the Master Driver Configuration Store, this homepage will not appear again. However, if the user needs to upload a different Master Driver Configuration Store at any point, this option can be accessed via the Menu icon in the top left of the application.
Warning
Uploading a new Master Driver Configuration Store will remove all current data in the application.

After a Master Driver File is uploaded, there will be two new buttons that will appear as green below.
Below The Master Driver button, there are two buttons that say: AHU File and Generate configuration file for… The Ahu File will allow the user to submit a file that has been created by the AHU config previously, and the Generate configuration file for… will allow the user to create a new configuration file for either the ECONOMIZER or AIRSIDE.

Economizer
This section will go over all of the items that are located within the Economizer button located in the Generate configuration file for… button.
When the Economizer is selected there will be a prompt to select Campus, Building, and Device. These will all be selected as dropdown inputs.

AHU Application Configuration
The AHU Application behavior is controlled through these configuration Pages:
- Point Mapping
- Settings
- Thresholds
Point Mapping
Point Mapping will be the first tab on the left side of the Economizer page. This will be located underneath the main configuration file and the Default Economizer.
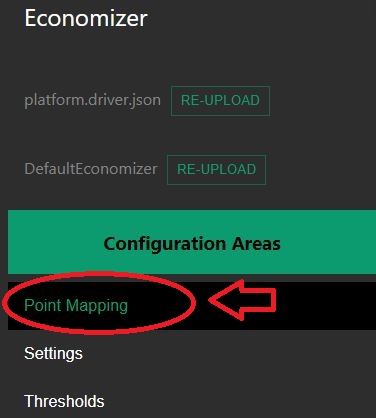
Once Point Mapping is selected, configurations will show on the center of the screen.

Once the configuration is shown in the center of the screen, the dropdown inputs may be selected to configure.
All of the Point Mapping configuration settings will be drop down inputs that are dependant Upon the main configuration file selected for the page.

JSON
Throughout the AHU application, there is a page on the right hand side of the screen with visual accessibility of the JSON code. As items are input into the tab sections of the application the JSON code will populate with its corresponding items.
For Example: When a Device(s) is chosen on on the first page, the JSON code will populate with those same chosen devices.
JSON Example: At the start of the Economizer page when the user is prompted to input a Device, there is 5 options to choose from:

After the device is chosen there will be a dropdown of devices to choose from.

As these devices are chosen, they will be stored within the Json code on the right side of the page as items are selected.

Settings
Settings is the second tab inside of the Ahu configuration Economizer section. Once settings is selected the center section will populate with configurations.

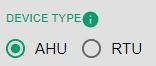
Device Type
Device Type will give you an option to either choose AHU or RTU underneath the settings title.
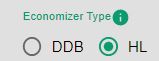
Economizer Type
Economizer type has two selections: DDB and HL. Choosing one will provide specific configuration settings.

Economizer Type: DDB
Data Window
This selection will be an integer type ranging from 0 to 60 minutes. The user may input an integer or use the slider to obtain the number required.

Numbered Required Data
This selection will be an integer type ranging from 0 to 20. The user may input an integer or use the slider to obtain the number required.

Desired Outdoor Air Fraction
This selection will be an integer type ranging from 5 to 30. The user may input an integer or use the slider to obtain the number required.

Open Damper Time
This selection will be an integer type ranging from 0 to 60 minutes. The user may input an integer or use the slider to obtain the number required.

Minimum Damper Setpoint
This selection will be an integer type ranging from 0 to 50 %. The user may input an integer or use the slider to obtain the number required.

Rated Cubic Feet Per Minute
This selection will be an integer type ranging from 0 to 6000 CFM. The user may input an integer or use the slider to obtain the number required.

Energy Efficient Ratio
This selection will be an integer type ranging from 1 to 15. The user may input an integer or use the slider to obtain the number required.

Temperature Deadband
This selection will be a floating point number ranging from 0.5 to 10. The user may also input a floating point number or use the slider to obtain the number required.

Economizer type: HL
The Economizer type HL will be the next selection. Once this option is selected, there will be new settings that the user may configure.
Economizer Switchover Setpoint
This selection will be a integer number ranging from 0 to 20. The user may input an integer or use the slider to obtain the number required.

Data window
This selection will be a floating point number ranging from 0 to 60 minutes. The user may input an integer or use the slider to obtain the number required. .. image:: _images/data_Win.JPG
Number Required Data
This selection will be a floating point number ranging from 0 to 60 minutes. The user may input an integer or use the slider to obtain the number required.

Desired Outdoor Air Fraction
This selection will be a floating point number ranging from 5 to 30. The user may input a floating point number or use the slider to obtain the number required.

Open Damper Time
This selection will be a floating point number ranging from 0 to 60 minutes. The user may input an integer or use the slider to obtain the number required.

Minimum Damper Setpoint
This selection will be a floating point number ranging from 0 to 50%. The user may input an integer or use the slider to obtain the number required.

Rated Cubic Feet Per Minute
This selection will be a floating point number ranging from 0 to 6000 CFM. The user may input an integer or use the slider to obtain the number required.

Energy Efficient Ratio
This selection will be a floating point number ranging from 1 to 15. The user may input an integer or use the slider to obtain the number required.

Temperature Deadband
This selection will be a floating point number ranging from 1 to 15. The user may input an integer or use the slider to obtain the number required.

Thresholds
The last tab in the AHU config: Economizer is the Threshold tab.

Once this tab is selected, there will be two options that appear on the center of the screen.

If Use Default thresholds* is selected, there will be no options to configure.
If Customize Threshold Parameters is selected, there will be new settings to configure.

Low Supply Fan
This selection will be a floating point number ranging from 0 to 100%. The user may input an integer or use the slider to obtain the number required.

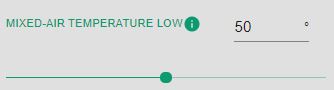
Mixed-Air Temperature Low
This selection will be a floating point number ranging from 40 to 60 degrees. The user may input an integer or use the slider to obtain the number required.
Mixed-Air Temperature High
This selection will be a floating point number ranging from 80 to 90 degrees. The user may input an integer or use the slider to obtain the number required.
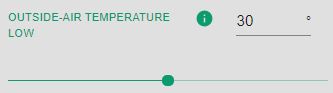
Outside-Air Temperature Low
This selection will be a floating point number ranging from 20 to 40 degrees. The user may input an integer or use the slider to obtain the number required.
Outside-Air Temperature High
This selection will be a floating point number ranging from 90 to 125 degrees. The user may input an integer or use the slider to obtain the number required.

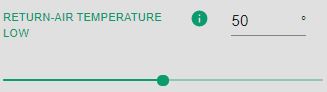
Return-Air Temperature Low
This selection will be a floating point number ranging from 40 to 60 degrees. The user may input an integer or use the slider to obtain the number required.
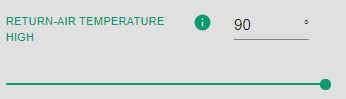
Return-Air Temperature High
This selection will be a floating point number ranging from 80 to 90 degrees. The user may input an integer or use the slider to obtain the number required.
Temperature Difference Threshold
This selection will be a floating point number ranging from 2 to 6. The user may input an integer or use the slider to obtain the number required.

Open Damper Threshold
This selection will be a floating point number ranging from 60 to 90. The user may input an integer or use the slider to obtain the number required.

OAF Temperature Threshold
This selection will be a floating point number ranging from 5 to 15. The user may input an integer or use the slider to obtain the number required.

Cooling enabled Threshold
This selection will be a floating point number ranging from 5 to 50. The user may input an integer or use the slider to obtain the number required.

Saving Files
Once everything within the Economizer is configured, the last option will be to save the AHU file.

Once the Save as button is selected, a new input will appear in the center of the screen.

This will allow the user to name the file whatever is desired. The file will automatically create the file as a .json file as well.
Once the save button is chosen, it will download to the browser as the file it was named.
